Why You Need to Winterize
Not winterizing your boat’s freshwater system causes the same category of costly freeze damage as failing to winterize your engine. Water expands approximately 9% in volume when it freezes. In a closed system — a hose, a pump housing, a faucet body, a fitting, an accumulator tank — that expansion has nowhere to go. The result is split hoses, cracked pump housings, fractured fittings, and ruptured water heater tanks. Unlike a burst pipe in a house, which you typically discover immediately, freeze damage in a boat’s freshwater system may not become visible until spring commissioning when water pressure is restored and the cracks begin to weep. By then, the damaged component is often a complete replacement rather than a repair.
Winterizing your boat’s potable water system is a straightforward process: drain as much water as possible, bypass or drain the water heater, then run non-toxic marine antifreeze through every fixture until the lines are protected. Done properly, the whole job takes less than an hour on most boats.
- Before You Begin
- Step One: Open the Faucets
- Step Two: Add Antifreeze
- Step Three: Run Antifreeze Through the System
- About Antifreeze
- Best Practice for Antifreeze Disposal
- Spring Recommissioning
- FAQs
Before You Begin
If your boat has a water heater, install a water heater bypass winterization kit before starting. A bypass kit routes the antifreeze around the water heater tank rather than through it, so you can drain the heater separately without having to fill the entire tank with antifreeze. This matters for two reasons: water heater tanks hold 6–12 gallons on most cruising boats, and filling that volume with antifreeze both wastes antifreeze and creates a larger antifreeze flush job in spring. A bypass kit pays for itself in antifreeze saved the first time you use it and makes the job significantly faster.
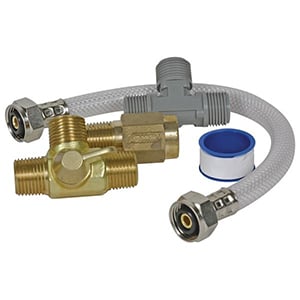
A water heater bypass winterization kit saves time and antifreeze by isolating the heater so it can be drained separately.
If the water heater is electric and uses an internal heating element, disconnect it from the electrical system before draining it. The heating element in an electric water heater is designed to operate submerged in water — running it dry, even briefly, burns out the element. Mark the circuit breaker or the electrical connection at the heater with a visible reminder tag to refill the heater before restoring power in spring. This is one of the most common and most expensive accidental damage scenarios at spring commissioning.
If your water system includes an accumulator tank, drain it separately before running antifreeze. An accumulator tank is a small pressure vessel, typically 0.5–2 gallons, that maintains pressure in the system between pump cycles and smooths out pump pulsation. It contains water under pressure inside a flexible bladder. If that water is not removed, the bladder can freeze and crack, which requires tank replacement. To drain: close the supply valve, open a faucet to release system pressure, then disconnect the hoses from the tank. If the tank does not drain completely by gravity, blow gently through the T-connection to force out residual water, or remove the tank entirely, shake out the water, and reinstall before running antifreeze. Never try to push compressed air forcefully through an accumulator bladder — you can damage the bladder beyond repair.
Before starting, gather your materials: non-toxic propylene glycol marine antifreeze (4–6 gallons for most boats; larger boats with long plumbing runs, multiple heads, and no water heater bypass may need 8–10 gallons), basic hand tools, rags, and a bucket. Review the owner’s manuals for your freshwater pump and water heater if you are unsure where the drain points and bypass connections are located.
Step One: Open the Faucets and Drain the Tank
Open all faucets — both hot and cold sides — and turn on the freshwater pump. Allow everything to run until the tank is fully empty and water flow stops. Then close all faucets and turn the pump off.
Do not skip secondary fixtures. Any branch line in the system that holds water is a freeze risk, regardless of how small it seems. Work through a complete list:
- All galley and head sink faucets (hot and cold)
- Cockpit shower and transom shower
- Wet bar or beverage station if connected to the potable system
- Freshwater washdown outlets
- Ice maker supply line (disconnect and blow out with air if possible — ice maker inlet valves can trap a small pocket of water that splits the valve body)
- Freshwater heads (the freshwater supply line that feeds the bowl flush)
- Any freshwater-fed anchor washdown
After draining, the tank will still have residual water on the walls and in low spots. This is expected and is why the antifreeze step is necessary — do not assume draining alone is sufficient protection in climates where temperatures regularly drop below 20°F.
Step Two: Add Antifreeze to the Tank
Pour four to six gallons of non-toxic propylene glycol marine antifreeze directly into the freshwater storage tank. On larger boats with multiple tanks, long plumbing runs to a forward head and a stern shower, or systems without a water heater bypass, plan for more — 8 gallons is a reasonable starting point and leftovers can be used in the engine raw water circuit or the marine sanitation holding system.
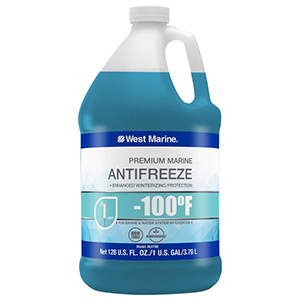
West Marine Propylene Glycol Antifreeze — rated for potable water systems and safe for use throughout the boat’s freshwater plumbing.
Use only non-toxic propylene glycol antifreeze rated for potable water and marine winterization. Automotive antifreeze (ethylene glycol) is highly toxic and must never be used in a freshwater system that will be flushed and used for drinking, cooking, or personal hygiene. Propylene glycol antifreeze is the same base compound used in food-grade applications and is safe for potable water systems when properly flushed in spring.
If you have a freshwater tank fill deck fitting, you can pour the antifreeze directly into the deck fill. If access is easier through a hatch or inspection port on the tank, use that. The antifreeze just needs to be inside the tank so the pump can draw it through the system.
Step Three: Run Antifreeze Through the System
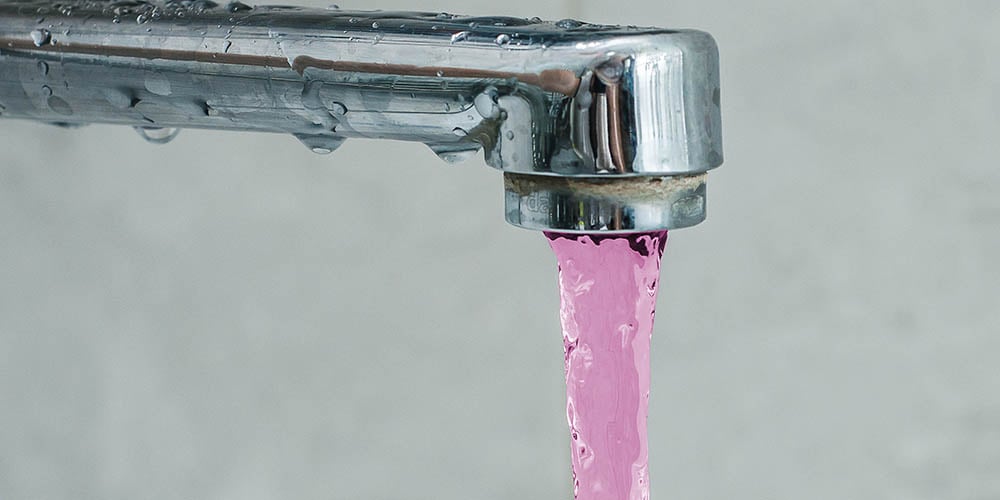
Turn the freshwater pump on. Starting with the fixture farthest from the pump, open the hot water side of that fixture first. You will see clear water run, then a transition to the pink color of the antifreeze. When the antifreeze runs continuously from the fixture for several seconds, close it. Then open the cold water side of the same fixture until antifreeze runs continuously, then close it.
Why start with the hot side? The hot water line runs from the pump to the water heater and back to each fixture. Starting with hot opens the longest and most complex branch of the system first, drawing antifreeze through the full hot water circuit before you work back toward the pump. If you start with the cold side, you may run out of antifreeze before the hot water lines are fully protected.
Work systematically from the farthest fixture back toward the pump, completing both hot and cold at each location before moving to the next. Do not turn off the pump between fixtures — keeping the system pressurized maintains consistent antifreeze delivery. When you have completed every fixture, turn the pump off.
Confirming protection: The appearance of continuously pink-colored antifreeze at each fixture is your confirmation that the antifreeze has displaced the water in that branch line. If a fixture runs clear for a very long time before pink appears, there may be a dead-leg or branch in the plumbing that is not being fully reached — check whether a valve is partially closed or whether there is a secondary connection you have missed.
The pump itself: On many boats the freshwater pump is self-priming and the pump body will be filled with antifreeze by the time you complete all fixtures. If your pump has a drain plug on the housing, open it after completing the system and drain the housing, then reseal it. Some pump designs trap water in the housing even after the system is drained — the antifreeze running through will protect most of these, but a frozen pump body is expensive to replace and worth the extra attention.
About Antifreeze
Non-toxic propylene glycol marine antifreeze comes in three concentration ratings: −50°F, −60°F, and −100°F. For most potable water system winterization applications, the −100°F rating is the recommended choice, even in moderate climates.
The reason is dilution. After draining, your freshwater tank and lines still contain residual water — on the tank walls, in low-lying hose sections, in faucet bodies, and trapped in the pump housing. When antifreeze enters the system, it mixes with this residual water. What enters the system as −50°F antifreeze may exit the far end of a long hose run at a significantly weaker concentration, with an actual freeze protection level closer to −20°F or −30°F. The −100°F formula provides enough concentration buffer that even after dilution by residual water, the resulting mixture still protects well below the lowest temperatures expected in most U.S. climates. The price difference between the −50°F and −100°F products is small compared to the cost of a single cracked pump housing or split hose run.
West Marine propylene glycol antifreeze is “virgin” antifreeze — it has not been recycled or reprocessed from used antifreeze. It meets NSF 60 standards for incidental contact with potable water and is safe for use in freshwater systems that will be flushed and returned to service in spring.
Best Practice for Antifreeze Disposal
Although propylene glycol antifreeze is non-toxic and biodegradable, best practice and most local regulations require that you not discharge it directly into the water, onto land, or into storm drains. In many marinas, antifreeze discharge into the bilge or overboard is prohibited regardless of the type.
At spring commissioning, flush the system thoroughly with fresh water until the antifreeze color and taste are gone. Collect the flushed antifreeze from the run-off if your marina requires it and dispose of it according to local facility guidelines. Many marinas have collection drums for used antifreeze during both fall winterization and spring commissioning. Spent propylene glycol antifreeze can often be recycled at the same facilities that handle automotive antifreeze recycling — check with your local marina or boatyard.
Spring Recommissioning: Flushing the System
When recommissioning in spring, the most important step is to refill the freshwater tank with clean water and flush the entire system before using it for drinking or cooking. Open each fixture in sequence from farthest to nearest and run water until the antifreeze color and odor are completely gone. This typically requires one to two full tank flushes on a larger boat. Run a final flush with the largest available amount of clean fresh water before declaring the system ready for potable use.
Before restoring power to the water heater, confirm the tank is completely full of water. An electric water heater element that energizes in an empty or partially empty tank will burn out within minutes. Refill the tank, open a hot water fixture until continuous water (not air) flows from it to confirm the tank is full and the air is purged from the lines, then close the fixture and restore power to the heater.
If you installed an accumulator tank bypass for winter, reconnect it now. Check all hose connections at the pump, tank fittings, and fixture supply lines for any signs of dripping once system pressure is restored — this is the moment freeze damage becomes visible if any water was missed during winterization.
Freshwater System Winterizing FAQ
No. Automotive antifreeze is ethylene glycol-based and highly toxic. It must never be used in a potable water system that will be flushed and used for drinking, cooking, or bathing. Use only non-toxic propylene glycol antifreeze rated for marine potable water system winterization. Propylene glycol is safe for potable water systems when properly flushed in spring and meets NSF 60 standards for incidental contact with drinking water.
A bypass is strongly recommended. Without a bypass, you would need to fill the entire water heater tank — typically 6–12 gallons — with antifreeze to protect it, which wastes a significant amount of antifreeze and creates a larger flush job in spring. A water heater bypass kit allows you to drain the heater separately and route the antifreeze around it, protecting the supply and return lines without filling the tank. If your heater is electric, always disconnect it from the electrical system before draining to prevent the heating element from burning out.
Most single-head recreational boats need 4–6 gallons. Larger boats with multiple heads, long plumbing runs from bow to stern, a cockpit shower, transom shower, and no water heater bypass should plan for 8–10 gallons. It is better to have more than you need — leftover propylene glycol antifreeze can be used in the engine raw water system or the marine sanitation system, and unused antifreeze stores well for next season if kept sealed.
Because antifreeze mixes with residual water left in the system after draining, reducing its effective concentration. What enters the system rated at −50°F may emerge from a long hose run at an effective freeze protection level of only −20°F or −30°F after being diluted by trapped water. The −100°F rating provides enough margin that even after dilution, the resulting mixture still protects well below the coldest temperatures most boats in the continental U.S. will experience. The price difference between −50°F and −100°F antifreeze is small compared to replacing a cracked pump or split hose run.
Fill the freshwater tank with clean water and flush the entire system by running each fixture until the antifreeze color and odor are completely gone — typically one to two full tank flushes on most boats. Before restoring electrical power to the water heater, confirm the tank is completely full by opening a hot water fixture until water (not air) flows continuously, then close it before energizing the heater. Reconnect any accumulator tank bypass, restore system pressure, and check all connections for leaks. This is when any freeze damage that was missed during winterization will become visible.