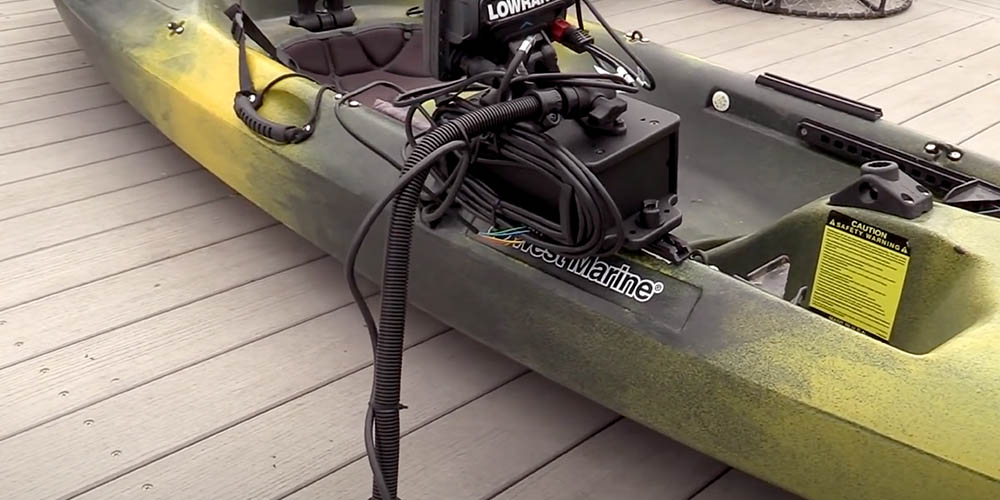
West Marine product specialist Mike Montgomery demonstrates a complete fishfinder installation on a West Marine Pompano sit-on-top kayak. The video covers every stage of the process in close-up detail: installing and sealing the track, building and installing the cell block, positioning and installing the transducer arm, installing the battery, and wiring the unit to power. The full installation took about four hours. Before you start your own, read the notes below — the decisions you make before drilling anything determine how well the finished installation works and holds up over time.
- What Makes a Kayak Installation Different
- Common Mistakes to Avoid
- Tools and Shopping List
- Installation FAQ
Before You Start: What Makes a Kayak Installation Different
Installing a fishfinder on a kayak is fundamentally different from installing one on a powerboat, and the differences matter at every stage. Understanding them before you begin will save you from the most common mistakes.
No dedicated wiring infrastructure. A powerboat has a fuse panel, a 12V circuit, and existing wire runs already in place. A kayak has none of these — you are building the entire electrical system from scratch, starting with the battery. The battery lives in the kayak’s hull, typically in a dedicated cell or storage area, and must be secured so it cannot shift in a capsize. The wiring run from the battery to the display is short — typically 2 to 4 feet — which is an advantage, but every connection must be watertight rather than just weatherproof, because a kayak fishfinder system routinely gets wet in ways a powerboat installation does not. Connections that are merely water-resistant will corrode faster in a kayak application than in almost any other marine context.
Track mounting is the foundation of the whole installation. The rail or track system that holds the display mount, transducer arm, and other accessories is the most permanent part of the installation — it is screwed and sealed directly into the kayak hull. Get the track position wrong and everything downstream is compromised. Before drilling, sit in the kayak in your normal fishing position and confirm that the track location puts the display where you can read it without craning your neck, and that the transducer arm will clear your paddle stroke on both sides at its full range of swing. Mark the track position with tape and verify it before picking up the drill. Moving a track after installation means drilling new holes and permanently patching the old ones — not a step you want to take twice.
Sealing every hull penetration is non-negotiable. A kayak hull is a closed flotation system — an unsealed hole in the hull admits water into the hull cavity and over time degrades structural integrity. Every screw hole drilled for the track must be filled with sealant before the fastener is installed. Use a marine-grade waterproof sealant rated for prolonged water immersion — not standard silicone, which is not rated for constant water contact. Apply sealant to the fastener threads, to the underside of the track where it contacts the hull, and allow it to cure per the manufacturer’s instructions before loading the track with weight. Rushing the cure time is the most common cause of track loosening on the water.
Transducer placement determines sonar performance. On a sit-on-top kayak, the transducer arm positions the transducer alongside the hull rather than under it, which means it is more exposed to turbulence from paddle strokes and hull movement. Position the transducer forward of the seat rather than behind it — forward placement keeps the transducer in calmer water during paddling strokes. The transducer face must be parallel to the water surface and fully submerged when the kayak is loaded to fishing weight. Test the depth of the transducer with a fully loaded kayak before finalizing the arm position — an under-loaded kayak rides higher and may not give you an accurate picture of where the transducer actually sits when you are on the water with all your gear.
Battery selection and management matter more on a kayak. A compact sealed lead-acid or lithium battery powers the unit — most kayak fishfinder systems use a 7Ah to 12Ah battery that fits in the hull storage area. Secure the battery so it cannot shift during paddling or in a capsize — a loose battery is both a wiring hazard and a balance hazard. Route the power wires so they cannot be pinched by the battery or snagged on gear. Use marine-grade tinned wire and proper crimp connections — not twisted wire ends and not wire nuts, which fail in a wet environment. Every crimp connection must be sealed with adhesive-lined heat shrink tubing.
Common Mistakes to Avoid
Not sealing screw holes before installing the track. This is the most common mistake in kayak accessory installation. Drilling an unsealed hole in a rotomolded polyethylene hull allows water to wick into the foam core of a composite hull or simply flood an internal cavity. Apply sealant first, insert the fastener while the sealant is wet, and allow it to cure before putting weight on the track. On polyethylene kayaks, note that not all sealants bond well to the plastic — use a product specifically recommended for polyethylene or a mechanical sealant like butyl tape that works by compression rather than chemical adhesion.
Positioning the transducer too far aft. The paddler’s stroke creates turbulence that degrades sonar signal quality when the transducer is directly alongside or aft of the seat. Even a clean, efficient paddle stroke pushes disturbed water along the hull’s sides — the transducer reads bubbles and turbulence as noise that washes out the sonar return. Mounting the transducer arm forward of the cockpit, beside the bow section of the hull, puts it in the calmer water forward of the paddler’s stroke.
Using unprotected wire connections. Connections that get wet repeatedly — as all kayak wiring will — corrode faster than in any other marine application. Every crimp connection must be sealed with adhesive-lined heat shrink tubing. The adhesive liner melts during heat shrink application and bonds to the wire insulation and terminal, creating a watertight seal rather than just a mechanical cover. Standard non-adhesive heat shrink is not sufficient for kayak applications. The connection between the power harness and the battery terminals should use proper disconnect terminals rather than bare wire twisted onto a terminal post.
Not testing the system fully loaded before the first fishing trip. Sit in the kayak with all your gear, paddles, tackle, and the fishfinder running, and verify that the transducer is fully submerged, the display reads depth correctly, and the track and mounts are secure. A kayak that rides two inches higher when empty can lift the transducer out of optimal position, particularly in shallow water where the difference between 4 inches and 6 inches of transducer depth changes the sonar performance measurably.
Tools and Shopping List
| Skill Level Description | |
|---|---|
| Installing the track and caulking: 2 out of 10 | |
| Assembling the Portable Kayak Transducer Kit: 5 out of 10 | |
| Electrical wiring and connections: 4 out of 10 | |
| Tools Required | Shopping List |
|
|
Kayak Fishfinder Installation FAQ
A complete installation — track mounting, transducer arm assembly, battery wiring, and fishfinder setup — typically takes three to five hours for a first-time installer. The installation in the video above took four hours. The most time-consuming steps are planning the track and transducer positions before drilling, and allowing sealant to cure before loading the track. Rushing either step is the most common cause of installation problems that require rework. Plan for a full afternoon and do not commit to your first fishing trip the same day.
Most fishfinder manufacturers offer kayak-specific portable kits that include a transducer arm, battery box, mounting hardware, and wiring harness sized for a kayak installation. These kits are the cleanest and most reliable approach because all components are designed to work together. You can use a standard fishfinder without the portable kit, but you will need to source or fabricate the transducer mount, battery housing, and cable management separately. For a first installation, a purpose-built kayak kit significantly reduces complexity and the risk of component compatibility issues.
Forward of the cockpit, along the hull beside the bow section, in a location where the transducer face is fully submerged at fishing weight and parallel to the water surface. Forward placement keeps the transducer in calmer water during paddling — aft placement subjects it to paddle turbulence that degrades sonar signal quality. Test the transducer depth with a fully loaded kayak before finalizing the arm position, since an unloaded kayak rides higher and the transducer may appear submerged when it will actually be too shallow once you add gear and body weight.
Use a marine-grade waterproof sealant rated for prolonged water immersion — 3M 4200, 3M 4000 UV, or equivalent products used for below-waterline boat hardware. Standard silicone is not rated for constant water exposure and will eventually fail. On polyethylene kayaks, note that chemical sealants do not bond well to the plastic — butyl tape or a mechanical-compression sealant works better than a bonding sealant on poly hulls. Apply sealant to the fastener threads and to the underside of the track where it contacts the hull surface before installing each fastener, and allow the sealant to cure fully before applying load to the track.
A compact sealed lead-acid or lithium battery in the 7Ah to 12Ah range is the standard choice. Most fishfinder units draw under 1A at normal operation, so a 7Ah battery provides seven or more hours of continuous use — adequate for a full day of fishing. Lithium batteries offer significantly lighter weight for the same capacity, which matters on a kayak where every pound affects paddling performance. Whatever battery you choose, secure it in a dedicated battery box or holder so it cannot shift during paddling or in a capsize, and protect all connections with adhesive-lined heat shrink tubing.
Yes, with the right mounting hardware. Any sit-on-top kayak with a flat or near-flat deck surface forward of the cockpit can accommodate a track-mounted fishfinder system. Some newer fishing kayaks have integrated transducer scuppers, built-in rod holders, and pre-routed wiring channels that simplify the installation significantly. If your kayak already has accessory tracks installed, the display mount can often be added without any drilling. If starting from scratch on a bare kayak, the track-drill-and-seal process shown in the video works on virtually any sit-on-top design.
Browse Fishfinders and Marine Electronics
- Fishfinders — sonar, CHIRP, downscan, and fish-finding electronics
- Chartplotters, GPS units, radar systems, and integrated navigation displays
- Kayak accessories — mounts, rod holders, anchors, and gear
- Kayaks — fishing, touring, sit-on-top, and recreational
- Marine sealants, adhesives, and caulking products
- Electrical wiring tools — crimpers, strippers, and heat shrink
- VHF radios, AIS, and marine communication equipment
- Marine stereos, speakers, amplifiers, and audio accessories